Browser Based

Dreamweaver is part of Adobe’s Creative Suite and their main web design and publishing application. Created to allow for simultaneous coding and “what you see is what you get” hands-on page design. Having only work briefly with Dreamweaver, most of the workshop was beneficial in teaching me the basics. One main benefit I found was having a background knowledge of HTML and general web standards, this helped me get to grips with everything we were being taught as well as aiding me in going one step further (e.g. inserting video as well as/rather than image).
Upon opening Dreamweaver I created a new Folder entitled CGB_site, from here I would then add the subfolder for Images so to keep everything tidy to avoid dead links and missing images. I gave the page a title and began entering simple text information and formatting it in the preset styles of Paragraph, Heading 1, Heading 2 etc. The first text inserted acted as a header for the page and would run across any subsequent pages on the site. A simple banner at the top with links back to the home, an About page and a mailto: link which would redirect browsers to the users’ default email client and automatically compose a new email with my specified address.
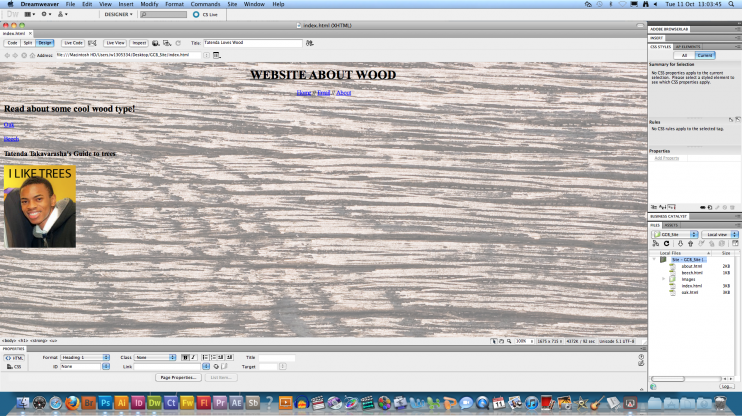
Dreamweaver displaying my index page in the split code and design view, enabling me to switch between WYSIWYG design and embedding pre-coded snippets such as YouTube videos.
Building upon the basic site I added a background image I found online. Originally the image was too dark so after bringing the brighness down in Photoshop I added the image through the Page Properties menu, as seen to the right.
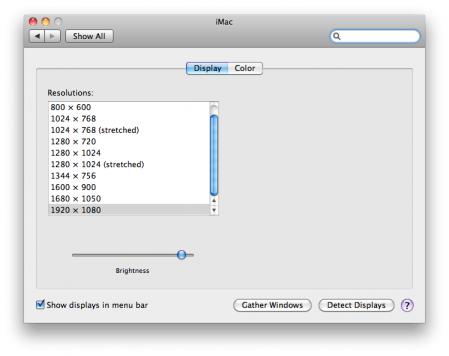
An important aspect for designing for web is understanding the resolution of you own machine as well as those of the potentially thousands of users visiting you page.
Entering the Mac’s System Preferences and clicking Displays gives you the resolution the Mac is currently operating at. The 1920 x 1080 resolution I’m running is more than the average user, especially one on a laptop so I’ll need to keep that in mind when desiging in the wider channels.

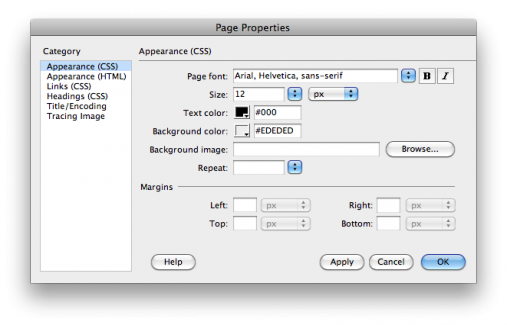
The Page Properties menu in Dreamweaver allows you to set some of the appareance options of your page. Inserting a background image and editing the text colour for static text, links, visited links etc.
I attempted using images and colours for the background before settling on the image I chose for my page. I also used some of the commonly used active/visited link text colours but also experimented with different shades of the blues and pinks to tie in with my page’s design.
Within the Page Properties menu is also the option to use CSS instead of HTML. The same presets apply with Background Image and Text Colour options, although you can also change the pages default font. I retrospectively experimented with the CSS Apperance option, changing all the text on my index page from Times to Arial.
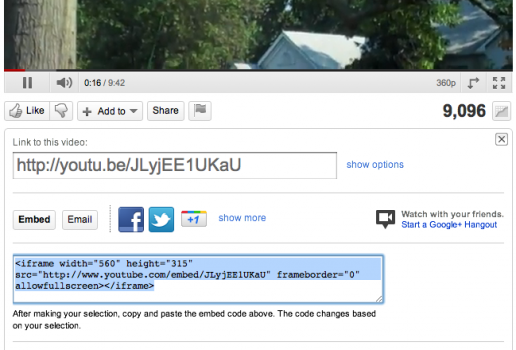
After importing images through the Insert > Image menu in Dreamweaver I began experimenting with video embedding. After navigating to YouTube and finding an appropriate video for my site you can select the Share option and then Embed to be presented with the HTML code snippet which simply needs to be copied and pasted into the Dreamweaver code section on a new paragraph
section.
Below shows the code inserted into Dreamweaver. If I wanted to increase the video size I could manually alter the pixel width and height.
The grey box symbolises where the video will be placed. I can cut and paste the object to move it just like an Image placeholder in Dreamweaver.
The text and arrow to the right of the grey box is simple experimentation with images. I created a transparent image in Photoshop and saved it as a PNG file so the transparency is saved, therefore meaning the image can sit on top of the background wood image.
Page header/banner, consitant across all pages on site for simple navigation. Code simply copied and pasted across top of each page in Dreamweaver.
Page Title added in Dreamweaver, useful for directing search engines in using your site in results.
Text in Heading 2, Banner above in Heading 1, text below in Paragraph.
Two clickable links, highlighted by their colours, both routing the user to other pages on the site.
Rollover Image that switches to inverted version of same image upon mouse rollover. Applied through menu below.
Image appearing when rollover occurs.
Links back to Home (index) page and a mailto: link to a specified email address as well as a simple About page link.
Woodgrain background found online and placed within Page Properties. Running across all pages on site.
Various text presets used, Heading 1 and Heading 2 for above the image and Paragraph for the body copy below.
Images imported and resized to sit evenly next to one another.
Mock copy lifted from online and pasted into Dreamweaver, stylised and aligned through the Modify menu.
Youtube video embedded using code snippet placed into Dreamweaver code view of site.
Table inserted in Dreamweaver, headers formatted to Bold for distinction and column width evened proportionally.
Page Title displayed by browser window.
Header carried over from Home page for consistancy and navigation ease.
2040 x 1980 pixel image in background from previous pages. The large size should ensure even usres with the largest screen size should see the browser window covered by the image.
Transparent image created in Photoshop and saved as PNG to insert in page.


Hotglue is a simple, open source web design platform that allows users to design sites in a purely “What-you-see-is-what-you-get” manner.
All browser based, a user can sign up and start designing their own site within 5 minutes. There’s no compatibility with Flash although you can still produce innovative sites through the importing of videos and images.
For a simple browser based web design tool, Hotglue has a wide variety of useful tools. One big positive for me with Hotglue is the fact no two sites will look the same thanks to the flexibility in the tools available.
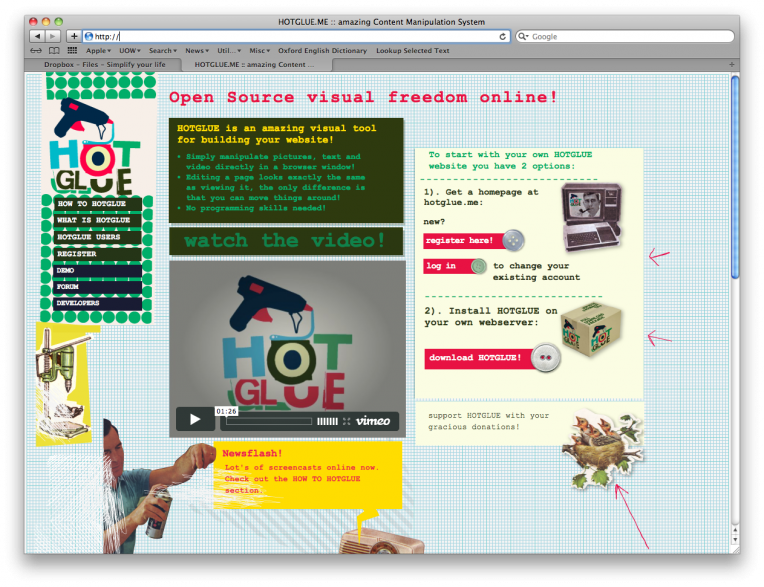
Thanks to the open source nature of Hotglue, users can download and install the Hotglue application on their own webserver. This potential for growth and expansion within the Hotglue community creates an exciting concept. The site itself could, amongst it’s many other uses, operate as a fully customizable social network where users completely design their contact pages. With tweaks to the source code you’d be able to create a collaborative, networked set up too where pages can be browsed between and linked to and from.
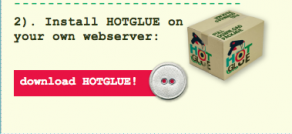
Change the page title
Change background colour
Upload background image
View page revisions
Make this the start page
Delete page
List all pages
Adjust background image selection
Show grid
Add a new text object
Add a new page
Upload a file
Embed YouTube or Vimeo video
My initial draft attempt at a Hotglue page. I tried experimenting with all the tools and including multiple elements in the site.
Polaroid image created in Photoshop and saved as PNG to save the transparency on the drop shadow for online. Then added with the upload a file tool and placed in the top left corner of the hotglue site.
Again using Photoshop I produce the block of text so I could use a custom font other than the presets in Hotglue, one drawback is that the text is a static image now instead of hightlightable, selectable text.
Social icons uploaded and acting as links to my other online presences.
Background produced in Photoshop at 2000 x 3000 so to accomodate widerscreen users/viewers and uploaded with the upload a background image tool.
Large text and arrow also created as images and uploaded.
SVG file of the Cardinals logo brought into photoshop, drop shadow added and rotated. Saved and uploaded as PNG file so to save transparency. Logo also acts as a link to Christopher Edwards’ hotglue page.
YouTube video sourced and embedded and resized accordingly all using the Embed video tool.
Upon logging in to Hotglue, users are presented with a slash page offering simple tools for account management.
From here users can enter the editing page application and beging altering their site.
Hotglue design is based on a few basic principals:
User Interface
• In editing mode pages are rendered identically to viewing mode.
• No menus or other parts of UI shall be visible without user’s request.
• Any newly created HOTGLUE page is always blank.
• No menu or interface shall interfere with page elements or change their position.
In edit mode, every element is selectable and new elements are automatically selected when uploaded. From here there are a whole new selection of tools users can use to alter and interact with their files.
Using the View Source menu item in Safari I'm able to view the HTML code for any website. I experimented by viewing the source code of my HotGlue site and pasting it into the Code section of Dreamweaver. The information and data carried across seamlessly. Helped by the fact images are linked with full URL address instead of localised file names like "/SiteName/index/image.jpg" for example.
By doing this I'd be able to "remix" my own site by crossing over web building platforms and continue editing in another application after starting the project.


One factor/issue I encountered when initially experimenting with Hot Glue was the lack of an ability to centre the whole page's contents, something almost 90% of well-designed sites seem to do these days to maximise the space within different users' screen resolutions. Looking further into new ways to layout my pages I decided to go against the usual vertical scrolling which goes against a screens landscape dimensions and present the research and work in a horizontally scrolling environment.
Before creating my HotGlue website I had to produce a wire frame and flow chart indicating the layout and basic mapping of the site and where each page would be interlinked.
Initially I produce the wire frame as a sketch before creating a more finalised version in Illustrator.
The use of a flow chart gives me an overview into the make-up of the site and what pages need to be linking between one another.
Of course, they are chances my Final Project page will reference and link to each of the other pages when complete.
After completing my site I submitted the URL for site mapping on SnapSiteMap. Here my pages were categorised and laid out highlighting any broken links as well.